
A blueprint for indoor gardens is a detailed, build-ready document that specifies plant species, placement zones, spacing, and technical requirements for a successful installation. When you specify indoor plants design blueprints correctly, the result goes far beyond aesthetics. Greenery boosts wellbeing by 15% and productivity by 6% in occupied indoor spaces. That outcome depends entirely on precision at the planning stage, whether you are an office manager in Toronto, an interior designer in Vancouver, or a business owner in Calgary fitting out a new space.
What core design principles guide effective indoor plant blueprints?
Effective indoor plant layout ideas start with five principles that every blueprint must address before a single plant is ordered.
-
Light matching. Light intensity varies by window orientation, so south-facing windows support high-light species like Ficus lyrata, while east-facing windows suit low-to-medium-light plants like Pothos or Aglaonema. Assign each plant species to a zone based on measured light, not guesswork.
-
Scale and proportion. A 6-foot Dracaena marginata anchors a double-height lobby. A 12-inch Calathea orbifolia belongs on a desk or low shelf. Match plant height and canopy spread to the furniture and ceiling scale of the room.
-
Grouping in odd numbers. Grouping plants in threes or fives avoids the stiff, formal look of symmetrical pairs. Odd-number clusters read as natural and organic to the human eye.
-
Layering heights. Place tall canopy plants at the back or center, mid-height plants in the middle ground, and trailing or ground-cover plants at the front. This creates depth and texture that a flat, single-height arrangement cannot achieve.
-
Focal point anchoring. Every grouping needs one dominant plant that draws the eye first. A large Monstera deliciosa or a sculptural Strelitzia nicolai works well. Supporting plants frame the focal specimen without competing with it.
Pro Tip: Before you finalize species selection, photograph each planting zone at 9 a.m., 12 p.m., and 4 p.m. on the same day. The difference in shadow and brightness across those three shots tells you more about real light conditions than any floor plan.
These principles apply equally to a single-room houseplant design guide and a full commercial fit-out. The scale changes; the logic does not.
What technical elements must be included in professional indoor plant blueprints?
A professional blueprint is a contractor-ready document, not a mood board. Vague renders cause costly errors on site. Professional-grade blueprints must include color-coded zones, plant species, counts, and spacing intervals so every trade knows exactly what to build and where.
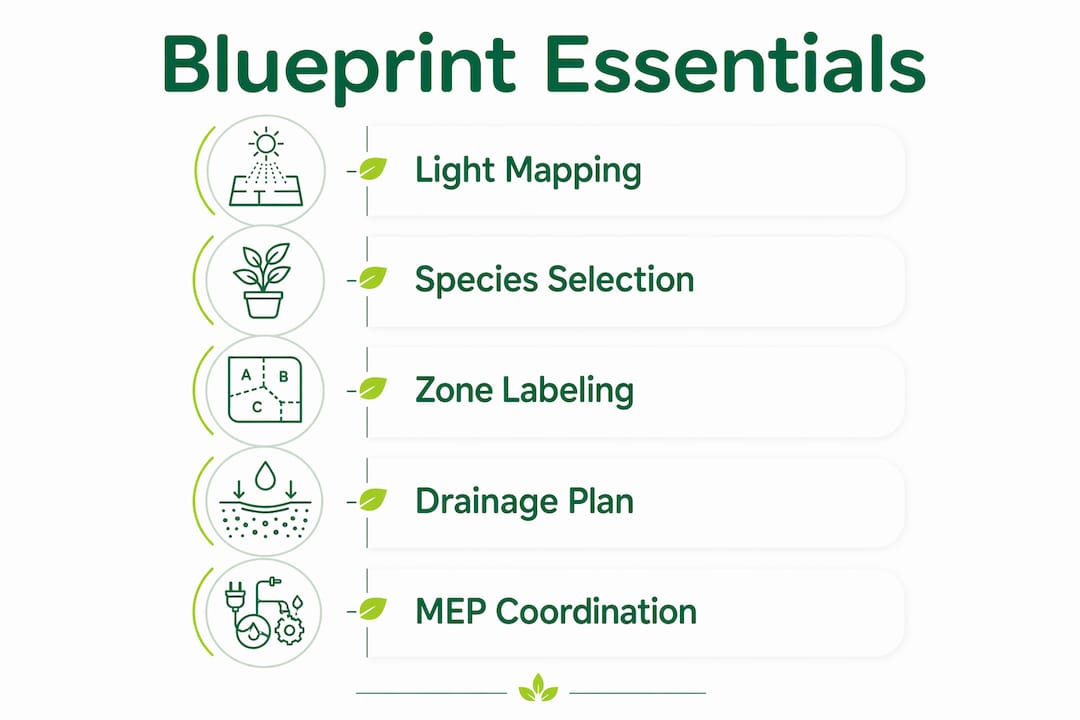
Here are the five technical elements every blueprint must contain:
-
Color-coded installation zones. Each zone gets a unique color and a legend entry defining its function, for example, reception feature planting, corridor accent planting, or atrium canopy layer. This removes ambiguity for the fit-out contractor.
-
Species list with quantities and spacing. Name each plant by its botanical name, state the quantity per zone, and specify the center-to-center spacing in inches. A spacing interval of 18 inches between planting centers is standard for medium-sized foliage plants in commercial settings.
-
Path widths and circulation dimensions. Planters and plant groupings must not obstruct egress or ADA-compliant circulation paths. Dimension every walkway clearance on the plan.
-
MEP integration notes. Blueprints developed in CAD or Revit can be overlaid directly onto mechanical, electrical, and plumbing drawings. This is how you coordinate grow-light electrical supply, irrigation lines, and floor drain positions with the relevant consultants before construction begins.
-
Drainage specification. Drainage decisions, whether to-waste or self-contained, and waterproofing must be finalized before floor finishing. Retrofitting drainage after tiles are laid is expensive and disruptive.
The table below summarizes the minimum technical data each blueprint zone entry should carry.
| Blueprint element | What to specify | Why it matters |
|---|---|---|
| Zone label | Color code + function name | Contractor clarity on site |
| Plant species | Botanical name + common name | Prevents substitution errors |
| Quantity and spacing | Count per zone + inches between centers | Accurate material ordering |
| Lighting requirement | Lux target + supplementary fixture type | Prevents post-install failures |
| Drainage type | To-waste or self-contained + waterproofing note | Avoids costly floor retrofits |
Pro Tip: Send your CAD or Revit plant layer to the electrical consultant at the same time you send it to the fit-out contractor. Grow-light circuits need to be roughed in early. Adding them after drywall is closed costs three to five times more.
What tools and preparatory steps ensure accurate indoor plant layout planning?
Accurate indoor garden planning tips begin with site assessment, not plant selection. Choosing plants before you understand the site is the single most common reason installations fail within the first year.
-
Light mapping with a lux meter app. Using a smartphone light meter app to record lux readings at each planting site is the most reliable preparatory step before plant selection. Take readings at multiple times of day and record them on your floor plan. A reading below 100 lux rules out most foliage plants without supplementary lighting.
-
Room mapping. Mark every window, heat source, air conditioning vent, and ventilation grille on your base plan. Heat from HVAC vents desiccates tropical foliage. Cold drafts from exterior doors stress subtropical species. These factors belong on the blueprint before species are assigned.
-
Plant selection by light zone. Once light zones are mapped, match species to zones by their confirmed light tolerance. Low-light zones suit Sansevieria trifasciata, Zamioculcas zamiifolia, and Aspidistra elatior. Medium-light zones open up Spathiphyllum, Philodendron, and Dracaena. High-light zones support Ficus, Strelitzia, and most palms.
-
Digital modeling. CAD and Revit are the professional standard for commercial projects. For smaller residential or retail projects, SketchUp or even scaled hand-drawn plans work well, provided dimensions are accurate.
-
Planting schedule. Map out when plants will be installed relative to construction completion. Plants installed too early in a dusty, low-humidity construction environment suffer stress and setback.
The comparison below shows how preparatory depth differs between a basic layout and a professional blueprint approach.
| Preparation step | Basic layout approach | Professional blueprint approach |
|---|---|---|
| Light assessment | Visual estimate | Lux meter readings per zone, multiple times of day |
| Species selection | Aesthetic preference | Light-zone matched, botanical name specified |
| Software | Freehand sketch | CAD or Revit with MEP overlay |
| Drainage planning | Not addressed | Specified before floor finishes |
| Maintenance schedule | Not included | Aligned with installation timeline |
How to execute and communicate your indoor plant blueprint to contractors?
Translating a finished blueprint into a successful installation requires clear communication at every handoff. A beautiful plan fails on site when contractors receive incomplete information.
-
Convert renders to dimensioned plans. Every render you produce for client approval must have a corresponding dimensioned plan with labeled zones, species lists, and quantities. The render sells the vision. The dimensioned plan builds it.
-
Provide spacing and material specs in writing. Verbal instructions on site get misremembered. Write the center-to-center spacing, planter dimensions, growing medium specification, and drainage type into a written scope of works document that accompanies the blueprint.
-
Coordinate with electrical and plumbing consultants early. The main cause of post-installation failure is missing supplementary lighting integration in the MEP design. Raise grow-light electrical requirements at the first MEP coordination meeting, not after the ceiling is closed. Full-spectrum LED grow lights placed 6–12 inches above foliage and operated 12–16 hours daily are the standard specification for low-light commercial zones.
-
Validate plant suitability on site before ordering. Walk the finished shell space with your lux meter before placing the plant order. Construction changes, added partitions, or relocated windows can alter light conditions significantly from the original design intent.
-
Document post-installation maintenance requirements. Hand the client or their facilities team a written maintenance schedule that specifies watering frequency, fertilization intervals, rotation needs for phototropic species, and replacement triggers. This document is as important as the blueprint itself.
Pro Tip: Schedule a six-week post-installation review with the client. Plants need time to acclimate, and minor adjustments to positioning or supplementary lighting at six weeks prevent the larger failures that show up at six months.
Key takeaways
Specifying indoor plants design blueprints requires light mapping, MEP coordination, and precise species documentation before a single plant arrives on site.
| Point | Details |
|---|---|
| Light mapping comes first | Record lux readings per zone before selecting any plant species. |
| Odd-number groupings work best | Clusters of three or five plants read as natural and avoid static symmetry. |
| MEP coordination is non-negotiable | Electrical supply for grow lights must be specified before ceiling and floor finishes close. |
| Drainage must be pre-specified | Decide between to-waste and self-contained drainage before floor finishing avoiding costly retrofits. |
| Blueprints need written specs | Dimensioned plans with species lists, spacing, and material notes prevent contractor errors on site. |
Why I always start with the lux meter, not the plant catalog
Most people approach indoor plant design the wrong way. They fall in love with a plant at a nursery or on a design blog, then try to find a spot for it. That approach produces beautiful installations that look great in the first month and decline steadily after that.
The professionals I respect most treat a new project the same way a structural engineer treats a site survey. They walk the space with a lux meter before they open a plant catalog. They map heat sources and HVAC vents before they sketch a single grouping. The blueprint for indoor gardens they produce is grounded in what the space can actually support, not what looks good in a render.
The other mistake I see constantly is treating the plant design as a separate workstream from the MEP design. Grow-light circuits, irrigation lines, and drainage points are infrastructure. They need to be in the MEP drawings from day one. Every time a client calls me about a failing installation, the root cause traces back to one of two things: wrong light levels or inadequate drainage. Both are entirely preventable with early coordination.
The good news is that the design principles themselves are not complicated. Odd-number groupings, layered heights, and a single focal plant per zone are rules you can apply immediately. The technical coordination is where most designers need support, and that is exactly where investing in professional documentation pays for itself many times over.
— Ben
How Greenspaceplants brings your indoor plant blueprint to life
Designing a great indoor plant layout is only half the work. The other half is making sure those plants thrive long after installation day.
Greenspaceplants works with businesses across Toronto, Vancouver, and Calgary to produce professional indoor plant designs that are build-ready from day one. Our team handles species selection, light zone matching, and full technical documentation so your contractors have everything they need. After installation, our Greenspace+ program covers regular maintenance, plant health monitoring, and replacements under a single fixed monthly fee. You get a living, healthy interior without managing the upkeep yourself. Browse our indoor plant portfolio to see completed commercial installations, or reach out to discuss your project directly.
FAQ
What does it mean to specify indoor plants design blueprints?
Specifying indoor plants design blueprints means producing a dimensioned, contractor-ready document that defines plant species, quantities, spacing, light requirements, and drainage for each installation zone. It is the step that converts a design concept into a buildable plan.
How do I map light levels before choosing plants?
Use a smartphone lux meter app to record readings at each planting location at multiple times of day. A reading below 100 lux requires supplementary grow lighting before most foliage plants can survive.
What software do professionals use for indoor plant blueprints?
CAD and Revit are the professional standard because they allow plant layers to be overlaid directly onto MEP drawings, which is critical for coordinating grow-light electrical supply and irrigation lines.
Why does drainage need to be specified so early in the process?
Drainage type and waterproofing must be confirmed before floor finishes are laid. Retrofitting drainage after tiling is complete is significantly more expensive and often requires removing finished flooring entirely.
How many plants should I group together for the best visual effect?
Group plants in odd numbers, typically threes or fives, to create a natural, organic look. Even-numbered pairs read as formal and static, which works against the living quality that plants bring to a space.