
To identify a disease on an office plant quickly, inspect leaf surfaces, stems, and root crowns for signs like spores, ooze, or rot, then document how far the problem has spread. Photograph the evidence and isolate the plant from healthy neighbors. If the pattern keeps progressing, or you spot fuzzy growth, wet-looking lesions, or a smell coming from the soil, that's your cue to stop guessing and send photos or a sample to a diagnostic clinic.
TL;DR:
- Most office plant diseases spread quickly within days, especially in humid, poorly ventilated areas, making early identification critical.
- Proper diagnosis relies on inspecting leaves, stems, roots, and soil, taking photos with scale, and noting recent environmental or care changes.
- Common issues like powdery mildew, root rot, and bacterial spots often mimic abiotic stress, requiring careful differentiation through signs and symptoms.
- Sending representative plant samples with detailed history helps confirm serious infections like viruses or advanced rot to avoid unnecessary treatment.
- Regular plant inspections, tool disinfection, and addressing environmental stressors prevent outbreaks and maintain healthy office foliage.
Table of Contents
- Office Plant Disease Identification: The Symptom Checklist
- Common Diseases That Affect Office and Indoor Plants
- Is It a Pathogen or Just Bad Conditions? How to Tell
- Using Photos and Apps for a Faster First Read
- Submitting a Sample: What Diagnostic Clinics Actually Need
- Stopping the Spread: Containment and Treatment That Actually Work
- How Professional Maintenance Teams Prevent Outbreaks Before They Start
- A Few Honest Words on Managing Plant Health in a Busy Office
- Where to Learn More About Plant Disease Diagnosis
- Sources
Office Plant Disease Identification: The Symptom Checklist
Most office plant problems get misdiagnosed because someone looks at one yellow leaf and jumps to a conclusion. A proper symptom checklist forces you to slow down and gather the same information a professional would ask for. This is the foundation of accurate plant health diagnosis, and it takes about five minutes per plant.
Work through the plant in this order, every time:
- Leaves, both surfaces. Flip leaves over. Powdery mildew often shows on the underside before it's visible from the top, and so do the early clusters of scale insects that create the sticky mess people mistake for disease.
- Stems and crown. Look where the stem meets the soil. Softening, dark streaking, or a collapsed base points toward crown or stem rot rather than a leaf-level problem.
- Soil and roots. Slide the root ball partway out of the pot. Healthy roots are firm and pale; mushy, brown, or foul-smelling roots signal rot before the leaves ever show it.
- New growth versus old growth. Diseases and nutrient problems often hit new growth first (viral distortion, calcium issues), while old growth typically declines first from age, low light, or root stress.
Once you've inspected the plant itself, step back and look at the bigger picture:
- Is this one plant, a cluster near it, or the whole display case affected?
- How fast is it moving? Days point to something infectious; weeks to months usually point to environmental stress.
- What changed recently? A new watering schedule, a moved thermostat vent, a fresh batch of fertilizer, or a plant swap from a supplier can all explain a sudden shift.
- What's the light and humidity like where the plant sits? Note it, even roughly.
If you're going to photograph the plant for your own records or to send to someone else, do it right the first time. Take one wide shot showing the whole plant in its location, one medium shot of the affected area, and one close-up with something for scale, a coin or a pen works fine. Include a shot of the soil surface and, if you pulled the plant to check roots, a photo of those too. Penn State Extension's diagnostic guidance notes that labs rely on this kind of environmental and care history nearly as much as the sample itself. A blurry close-up with no context photo is close to useless for anyone trying to help you remotely.
A quick internal resource worth bookmarking for this exact workflow is our facility manager plant checklist, which breaks this same inspection routine into a six-step habit you can run before watering day.
Common Diseases That Affect Office and Indoor Plants
Interior plants face a narrower set of recurring problems than outdoor landscapes, mostly because office conditions (low airflow, consistent low light, overwatering by well-meaning coworkers) create the same favorable conditions again and again. Here's what shows up most often, and how to recognize each one.
- Powdery mildew. A white or gray powdery coating on leaves and stems, usually starting on lower or shaded leaves. It thrives in still, humid air with poor circulation, exactly what you get near a stagnant HVAC pocket. Rub it with a finger; if it smears white and comes off, that's a strong confirming sign.
- Root and crown rot (Pythium, Phytophthora, and related fungi). Wilting despite moist soil is the classic tell, because the roots can no longer take up water even though it's available. Pull the plant and check: mushy, blackened roots with a sour smell confirm rot far more reliably than anything visible above the soil line.
- Botrytis (gray mold). Fuzzy gray-brown growth on dying leaf tissue, flower debris, or stems, especially where dead plant matter has piled up in a crowded pot. Botrytis spreads fast between plants set close together, which makes it a particular risk in dense office displays or lobby arrangements.
- Bacterial leaf spot. Look for water-soaked lesions that often have a yellow halo and an angular shape, following the leaf veins rather than spreading in a circle like many fungal spots. These lesions can look greasy or translucent when held up to light.
- Viral symptoms. Mosaic patterning (blotchy light and dark green), leaf distortion, or stunted new growth without any visible spots or rot are the red flags. Viruses are the one category on this list that genuinely require lab confirmation. There's no reliable at-home test, and misdiagnosing a nutrient deficiency as a virus (or vice versa) leads to wasted treatment.
One detail that trips up a lot of well-meaning plant owners: several of the most common "diseases" people report aren't diseases at all. Brown leaf tips from dry indoor air, yellowing from overwatering, and leaf curl from cold drafts near a window all mimic infectious symptoms but have zero pathogen involvement. The Plantwise diagnostic field guide is built specifically around this confusion, matching common symptoms to both biotic and abiotic causes so field diagnosis doesn't default to "it must be a disease" every time a leaf looks off.
Interiorscape plants carry an extra layer of risk that outdoor landscape plants don't: most tropical species sold for offices are already stressed by growing conditions far from their native habitat, and disease can be introduced anywhere along the production and distribution chain before the plant ever reaches your lobby. That's one reason a plant that looked perfect on delivery day can develop symptoms within its first month indoors.
Is It a Pathogen or Just Bad Conditions? How to Tell
The single most useful diagnostic question is: is this spreading, or is this just sitting there? Infectious diseases move. They start on one leaf, then a neighboring one, then jump to the plant next to it. Abiotic problems (bad light, inconsistent watering, temperature stress) tend to show up on a similar pattern across the whole plant or even across several plants that share the same care routine, without the leaf-to-leaf progression.
Plant Disease Diagnosis guidance from the American Phytopathological Society draws a sharp line between signs and symptoms, and this distinction matters more than most people realize. Symptoms are how the plant reacts (wilting, yellowing, curling). Signs are physical evidence of the pathogen itself (spores, fungal threads, bacterial ooze, fruiting bodies). Symptoms alone are rarely enough to diagnose anything. Signs are close to a smoking gun.
- Check timing. Sudden onset over a day or two usually means a chemical exposure, a cold draft, or root shock from repotting. Gradual decline over weeks points to either a slow-moving root disease or a chronic care issue like underwatering.
- Look for spores, mold, or fruiting bodies, not just discoloration, before you call something a disease.
- Try the incubation trick. Seal a symptomatic leaf in a plastic bag with a damp paper towel for 24 to 48 hours. Cornell's extension team notes that this often coaxes fungal signs into visibility that weren't detectable on the plant itself, since spores and fruiting bodies need moisture to develop.
- Pull a root sample. Rot smells sour or rotten and roots turn mushy brown; a plant that's simply underwatered has dry, brittle, but intact-looking roots.
Pro Tip: Keep a sealed sandwich bag and a cheap magnifying loupe in your desk drawer. The bag turns any suspicious leaf into a mini incubation chamber overnight, and the loupe catches the tiny black dots (pycnidia) or thread-like growth that your naked eye will miss entirely.
Using Photos and Apps for a Faster First Read
Photo-based identification tools are useful for narrowing possibilities fast, but they're a first pass, not a verdict. Treat any app result as a hypothesis to check against the symptom checklist, not a diagnosis to act on.
Get the photo right and you'll get a better read, whether from an app or a human expert:
- Shoot in natural, even light, direct sun creates glare that hides subtle discoloration.
- Take one wide context shot, one medium shot of the affected zone, and one macro close-up with a coin or ruler for scale.
- Photograph both sides of at least two or three affected leaves.
- Include a shot of the base of the plant and the soil surface.
Several university extension programs run free photo-submission services where you email images along with a brief description and get a preliminary read back, often within a few business days. These are genuinely useful for common problems, but they typically flag anything ambiguous or high-stakes for a formal sample submission instead of guessing from pixels alone.
Apps and photo tools struggle most with the diseases that matter most: root rot (invisible in a leaf photo), viral symptoms (which mimic nutrient deficiencies constantly), and early-stage bacterial infections. If a photo tool gives you a confident answer for anything happening below the soil line, be skeptical. That's exactly the kind of case that belongs in a physical sample, not a camera roll.
Submitting a Sample: What Diagnostic Clinics Actually Need
Send a sample when the identification genuinely matters, meaning multiple plants are affected, the problem keeps spreading despite basic care fixes, or you suspect something serious enough to justify certainty before you invest in treatment or replacement.
- Collect the right material. For small plants, extension clinics often prefer the whole plant, roots and all. For larger specimens, take representative leaves showing a range of symptom stages, from just-starting to advanced.
- Handle roots carefully. Keep soil around the root ball if possible, or rinse gently and wrap roots in damp (not soaked) paper towel.
- Package correctly. Wisconsin Horticulture's extension guidance recommends plastic bags with a little air space for whole plants, or leaves layered on damp paper towel, and calling ahead to confirm the lab's preferred handling before you ship anything.
- Attach your notes. Include your photos, a rough timeline of when symptoms first appeared, your regular watering and light routine, and any treatments already tried.
Expect turnaround times that vary depending on the lab and whether culturing is needed, plus a modest fee that varies by institution. Clinics typically report back with a written identification and management recommendations rather than a phone call, so ask upfront how results will be delivered.
Stopping the Spread: Containment and Treatment That Actually Work
The first move, always, is isolation. Move the suspect plant away from others immediately, even before you've confirmed anything, because a day of delay can mean the difference between one infected plant and five.
- Snip off heavily infected leaves or stems with disinfected shears, dropping cuttings straight into a bag rather than the floor or a shared bin.
- Disinfect tools between cuts using diluted bleach (about one part bleach to nine parts water) or isopropyl alcohol wipes.
- Clean pots and trays with the same diluted bleach solution before reusing them for any plant.
- Fix the underlying cultural issue, correct drainage, space plants for better airflow, and empty saucers that collect standing water.
- Reduce humidity pockets near vents or in enclosed corners, since stagnant HVAC airflow is a documented driver of spore spread and localized humidity buildup in commercial interiors.
Some plants aren't worth saving. Advanced root rot, confirmed viral infection, or a plant that's lost most of its foliage is usually cheaper and faster to replace than to nurse back. When you do replace it, don't reuse the old pot without a full bleach cleaning, and don't set the new plant in the exact same spot until you've addressed whatever caused the original problem, whether that's drainage, airflow, or a light level the plant species was never suited for.
Pro Tip: Rotate your plants a quarter turn every time you water them. Phototropism means plants lean and grow unevenly toward light, and that uneven growth creates dense, shaded pockets on one side where humidity lingers and disease takes hold first.
How Professional Maintenance Teams Prevent Outbreaks Before They Start
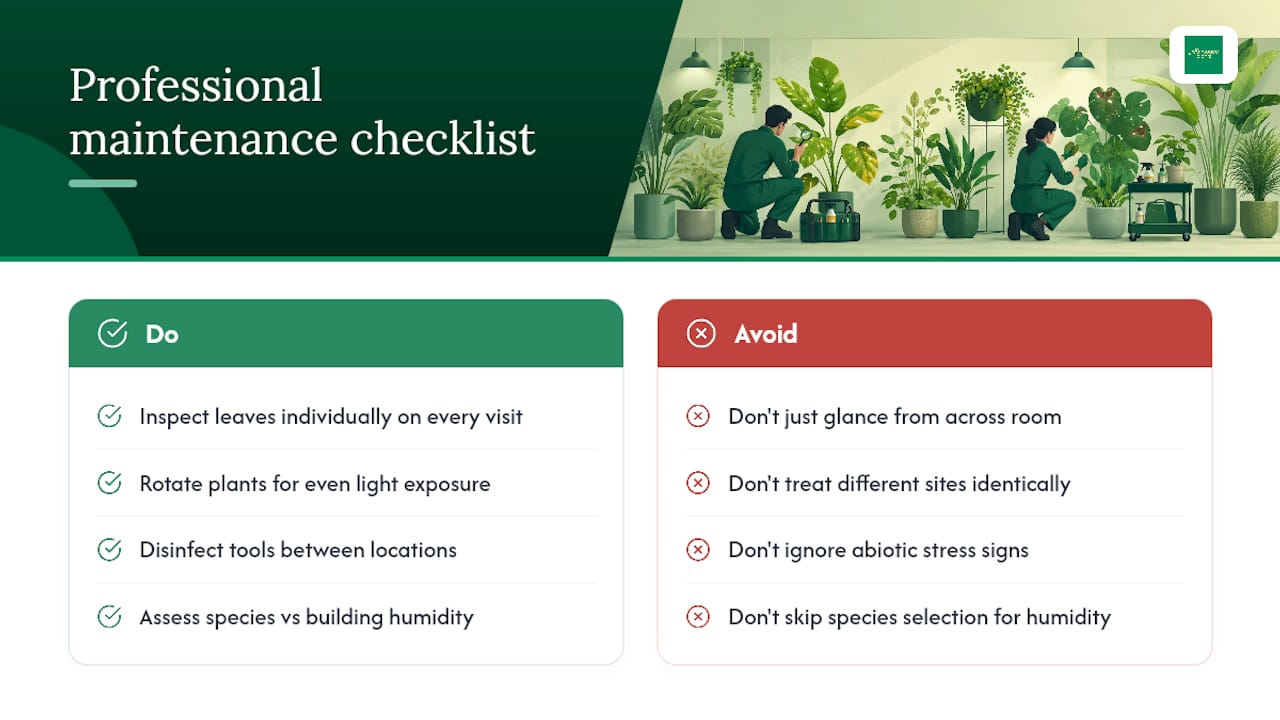
Professional technicians treat every routine visit as a diagnostic check, not just a watering run. That habit is the real difference between an office that catches a problem at one yellowing leaf and one that discovers it after an entire lobby display needs replacing.
A proper maintenance visit includes a leaf-by-leaf inspection, not a glance from across the room. Technicians rotate plants for even light exposure, disinfect tools between locations, and identify which species in an office are more susceptible to the humidity patterns of that building. That last point matters more than people expect. A ground-floor lobby near a revolving door behaves nothing like a windowless conference room three floors up, and treating them identically is how avoidable outbreaks happen.
Good maintenance also means catching abiotic stress before it turns into a real vulnerability, because a plant weakened by poor light or erratic watering is far more susceptible to opportunistic disease than a healthy one, as explained in this indoor plants for air purification guide. If you're building out your own care routine, our guide to allergy-friendly office plants covers species selection with this same health-first lens.
A Few Honest Words on Managing Plant Health in a Busy Office
Nobody on a facilities team has time to become a plant pathologist, and that's fine. The goal isn't expertise, it's catching problems early enough that a five-minute leaf check on a Tuesday saves you from replacing an entire lobby display in six weeks. I've seen offices skip that check for months because "the plants looked fine," only to discover root rot had already spread through half a display case by the time anyone noticed the wilting.
The checklist above works because it's boring and repeatable, not because it's clever. Run it, trust what you see, and call in a professional the moment something spreads faster than your patience for guessing.
— Nicole
Where to Learn More About Plant Disease Diagnosis
For deeper reference or to submit a sample yourself, university extension plant pathology programs remain the most reliable free resource available. Start with Penn State Extension's diagnostic framework or Cornell's identification tips, both of which link to their respective plant diagnostic clinics for formal sample submission.
Ready to take disease risk off your own plate entirely? Greenspace Plants' interior plant services include routine inspection, sanitation, and a healthy plant guarantee, so outbreaks get caught during a scheduled visit instead of after they've spread through your lobby.
Sources
- Strategies for Identifying and Managing Plant Diseases – Wisconsin Horticulture
- Diagnosing a Plant Problem 101 — Penn State Extension
- General tips on identifying plant diseases — Cornell Vegetables
- Diseases of Interiorscape Plants — Western Forum